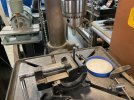
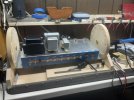
After the Stewmac Brit Plex 45 disaster and did get all my money refunded which they are now no longer available for a time until they re engineer the kit and instruction book. I got a JTM 45+ a 45/50 watt amp with a few tricks I liked. I already have two stock Marshalls so wanted something with a few mods and I liked the switching from the tube rectifier to the solid state. This one is from scratch too they give you a blank resen board and all the turret pegs loose. yesterday built the turret board while I was waiting for new tube sockets to arrive as they included the wrong ones with one inch long pins instead of eyelets. So here is my work so far… i used my drill press to drill holes for a snug fit and pressed them with a swaging tool I made in combination with the little tube included with the kit
You are using an out of date browser. It may not display this or other websites correctly.
You should upgrade or use an alternative browser.
You should upgrade or use an alternative browser.
Building a JTM45+ from Tube Depot
- Thread starter Phoenix1
- Start date
This site may earn a commission from merchant affiliate links like Ebay, Amazon, and others.

paul-e-mann
Well-Known Member
This will be fun watching you build it! You were doing a good job on the other one. What's the plan for the under board wiring? I think the next time I build an amp I'll put all the under wire on top to avoid the stress of wondering if it will fall out or not. When I had to do troubleshooting it was a real pain to have to dismantle the amp to check under the board.After the Stewmac Brit Plex 45 disaster and did get all my money refunded which they are now no longer available for a time until they re engineer the kit and instruction book. I got a JTM 45+ a 45/50 watt amp with a few tricks I liked. I already have two stock Marshalls so wanted something with a few mods and I liked the switching from the tube rectifier to the solid state. This one is from scratch too they give you a blank resen board and all the turret pegs loose. yesterday built the turret board while I was waiting for new tube sockets to arrive as they included the wrong ones with one inch long pins instead of eyelets. So here is my work so far… i used my drill press to drill holes for a snug fit and pressed them with a swaging tool I made in combination with the little tube included with the kit
Marcomel79
Well-Known Member
Id do over the board wiring. Less stress of wires falling and easier to troubleshoot... look forward to your build!
paul-e-mann
Well-Known Member
Isnt it terrible that amp layouts put the wires on the bottom? I had no idea they could be on top until I had a problem and I started cursing they werent on top, then through research I found you can put them on top! And wrap them on the turrets instead of putting them in the turrets. I had so much trouble cuz I had wires going into the top and bottom of the turrets, made it real difficult for soldering!Id do over the board wiring. Less stress of wires falling and easier to troubleshoot... look forward to your build!
Marcomel79
Well-Known Member
Yeah man, i really dont like it. It might make the amp look neater, but i like the look of over the board wiring, and the peace of mind of not worrying about wires falling down....Isnt it terrible that amp layouts put the wires on the bottom? I had no idea they could be on top until I had a problem and I started cursing they werent on top, then through research I found you can put them on top! And wrap them on the turrets instead of putting them in the turrets. I had so much trouble cuz I had wires going into the top and bottom of the turrets, made it real difficult for soldering!
Just horrible if, god forbid, there is a cold solder joint... some people do it but i dont trust myself...
Resident 217
Well-Known Member
- Joined
- Jul 10, 2023
- Messages
- 909
- Reaction score
- 1,458
Why not try wiring it point to point . It may take a bit more time but worth it.
Marcomel79
Well-Known Member
I guess people want the amp to look like a Marshall....Why not try wiring it point to point . It may take a bit more time but worth it.
ferrellrooster
Active Member
I put all of the pot wires under the board. And when I had issues I was almost at a point of having to remove the board to troubleshoot. Just ask Paul E man lol. I know Im new here, but maybe this will help? When you are finished building your board and have all resistors etc. in place and bolted down, the pot and socket wires, try wrapping one wire around the peg and another soldering the wire strait to the wires that are at each peg and see which is to your liking. It takes less heat to solder wire to wire than wire to peg and less chance of solder to run out of the bottom of a peg. Or is that point to point?
Marcomel79
Well-Known Member
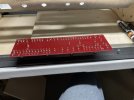
One good thing would be to solder the jumper to the turrets first, like this:I put all of the pot wires under the board. And when I had issues I was almost at a point of having to remove the board to troubleshoot. Just ask Paul E man lol. I know Im new here, but maybe this will help? When you are finished building your board and have all resistors etc. in place and bolted down, the pot and socket wires, try wrapping one wire around the peg and another soldering the wire strait to the wires that are at each peg and see which is to your liking. It takes less heat to solder wire to wire than wire to peg and less chance of solder to run out of the bottom of a peg. Or is that point to point?

This way, all thats left to solder are the components themselves. If you take care to pre-tin your turrets, soldering the components will be fast and your jumpers will stay hooked in place.
Worked for me....
Last edited:
ferrellrooster
Active Member
that looks really really good.One good thing would be to solder the jumper to the turrets first, like this:
View attachment 138335
This way, all thats left to solder are the components themselves. If you take care to pre-tin your turrets, soldering the components will be fast and your jumpers will stay hooked in place.
Worked for me....
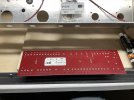
No, point to point is where the components (resistors, capacitors etc) are wired from tag strip or turret board strip directly to the tube sockets, pots etc, like seen in this pic.Or is that point to point?

Cheers
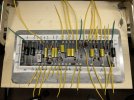
This is the finished turret board on my last stewmac build ! I never filled the center holes with solder I just wrapped and solderedI put all of the pot wires under the board. And when I had issues I was almost at a point of having to remove the board to troubleshoot. Just ask Paul E man lol. I know Im new here, but maybe this will help? When you are finished building your board and have all resistors etc. in place and bolted down, the pot and socket wires, try wrapping one wire around the peg and another soldering the wire strait to the wires that are at each peg and see which is to your liking. It takes less heat to solder wire to wire than wire to peg and less chance of solder to run out of the bottom of a peg. Or is that point to point?
Attachments
Joesatch
Active Member
- Joined
- Mar 30, 2012
- Messages
- 155
- Reaction score
- 151
i've built it. i dont recommend incorporating the SS/Tube rectifier switch. Just build it with the tube rectifier like the original.
Tube Depot JTM45
Tube Depot JTM45
ferrellrooster
Active Member
oh hell no lol not in my wheelhouseNo, point to point is where the components (resistors, capacitors etc) are wired from tag strip or turret board strip directly to the tube sockets, pots etc, like seen in this pic.View attachment 138425
Cheers

I might do that ! Been busy so not had much chance to get back to it, but soon !This will be fun watching you build it! You were doing a good job on the other one. What's the plan for the under board wiring? I think the next time I build an amp I'll put all the under wire on top to avoid the stress of wondering if it will fall out or not. When I had to do troubleshooting it was a real pain to have to dismantle the amp to check under the board.
paul-e-mann
Well-Known Member
The more I think about it, all wire should be wrapped and soldered to the outside of the turret (you say peg), only caps and resistors should be soldered inside the turret. I had a hard time jamming everything into the turrets for soldering.I put all of the pot wires under the board. And when I had issues I was almost at a point of having to remove the board to troubleshoot. Just ask Paul E man lol. I know Im new here, but maybe this will help? When you are finished building your board and have all resistors etc. in place and bolted down, the pot and socket wires, try wrapping one wire around the peg and another soldering the wire strait to the wires that are at each peg and see which is to your liking. It takes less heat to solder wire to wire than wire to peg and less chance of solder to run out of the bottom of a peg. Or is that point to point?
paul-e-mann
Well-Known Member
I like the way you did this!After the Stewmac Brit Plex 45 disaster and did get all my money refunded which they are now no longer available for a time until they re engineer the kit and instruction book. I got a JTM 45+ a 45/50 watt amp with a few tricks I liked. I already have two stock Marshalls so wanted something with a few mods and I liked the switching from the tube rectifier to the solid state. This one is from scratch too they give you a blank resen board and all the turret pegs loose. yesterday built the turret board while I was waiting for new tube sockets to arrive as they included the wrong ones with one inch long pins instead of eyelets. So here is my work so far… i used my drill press to drill holes for a snug fit and pressed them with a swaging tool I made in combination with the little tube included with the kit

ferrellrooster
Active Member
I soldered the pot wires to board but failed to put all the socket wires on the board first like this build here which looks 1,000 times better. thats why I didnt solder to outside of turret. Rookie mistake. I guess if you screw up like I did then it may helpThe more I think about it, all wire should be wrapped and soldered to the outside of the turret (you say peg), only caps and resistors should be soldered inside the turret. I had a hard time jamming everything into the turrets for soldering.

If I do another one it will be just like the one here
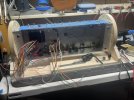
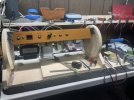
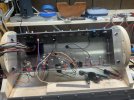
Well after a bit of a break not by my intention but got back into it today finally !!!! Wife got strep and covid at the same time same day DAMN ! Garage got done so put together a lift and finally found time to get inside and do some serious work ! Got the face plates and pots and jacks installed along with the transformers. They did change over to Hammond Transformers which will be fun since all the wires come out in a single bundle but will tidy things as I go. One comment I did notice mentioned Tube Depot does throw in a couple mods like the rectifier which was recommended to just put as original…. But this thing has optopns for many different sounds and tones so I think I will build as it was planned by TD. I already have two stock Marshall stacks and building this one to play with and may decide on sending this one in different directions if I feel like. I would rather risk $1000 that a $3500 head as I am just basically a novice here. I know a little but really want this as a learning experience to get better and understand whats going on.
Attachments
Similar threads
- Replies
- 9
- Views
- 1K
- Replies
- 77
- Views
- 6K
- Replies
- 10
- Views
- 873