Completely Out of My Depth - Modulus 50w 69 Build

  • Thread starter kingfredward
  • Start date
  • This site may earn a commission from merchant affiliate links like Ebay, Amazon, and others.

kingfredward

Well-Known Member
Joined
Sep 30, 2022
Messages
97
Reaction score
299
All done. Godamn I am anxious now haha
IMG_8143.jpegIMG_8142.jpegIMG_8141.jpegIMG_8140.jpegIMG_8138.jpeg
I know caps are what kill me so I have a discharge took what do you reckon?
IMG_8145.jpeg
 

Attachments

  • IMG_8139.jpeg
    IMG_8139.jpeg
    238.5 KB · Views: 2

PelliX

Well-Known Member
Joined
Jun 16, 2020
Messages
7,251
Reaction score
14,719
I know caps are what kill me so I have a discharge took what do you reckon?

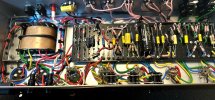
The amp is looking good! I can't exactly make out every solder joint from those pics due to the resolution, but overall it seems fine. You mentioned that you checked for continuity in various places. I often do the inverse, too - just make sure that certain points have plenty of resistance to ground where I expect it. I'd rather have a component float than short - generally.

You have an LBL, I believe, and you know the basics of firing it up without valves first, etc. Start with a low wattage bulb, etc.

The cap discharger looks like... many of them. If it's rated for the voltages you're dealing with I guess it should be fine.
 

kingfredward

Well-Known Member
Joined
Sep 30, 2022
Messages
97
Reaction score
299
So got some good news and some bad news …


IMG_8153.jpegIMG_8151.jpeg


Started up fine nothing went pop and stayed stable

However

IMG_8152.jpeg

When it came to putting in the preamp tubes …. There was solder weirdly between the holes . So couldn’t get the tube in. I put the soldering iron to get rid of it and f*cked it up.

This meant that the middle preamp tube didn’t heat up and glow
IMG_8154.jpeg
So I didn’t hit standby for fear of something going bang. I guess I buy a new socket and wire that in?
 

NickKUK

Active Member
Joined
Apr 5, 2024
Messages
159
Reaction score
138
So. learning experience.

1. Sparklies = bad news
2. Carbon = bad
3. Slow step by step = good.

Back to check the connections, step by step.
 

BlueX

Well-Known Member
Joined
May 5, 2020
Messages
2,679
Reaction score
5,639
Location
Sweden
Looks good, except for the hickup.
I guess I buy a new socket and wire that in?
Yes, get a new one. That one's toast.

Solder blobs and strand cutoffs can cause a lot of problems. Magnifying desk lamp and inspection mirror, together with tweezers and brush, are useful.

Magnifier and inspection mirror.jpg
 

BlueX

Well-Known Member
Joined
May 5, 2020
Messages
2,679
Reaction score
5,639
Location
Sweden
Started up fine nothing went pop and stayed stable
B+ 319 VDC seems low. When you start up again, you could measure VAC before rectifier (at red arrows in pic below). You measure from each pin to ground/chassis, one at the time. Don't short between these, very high voltage!

PT MOD002 should have 345 - 0 - 345 VAC (if that's the PT you're using).

Edit: Could of course be that the amp is connected after LBL, that would explain.

HT - B+.jpeg
 
Last edited:

NickKUK

Active Member
Joined
Apr 5, 2024
Messages
159
Reaction score
138
Looks good, except for the hickup.

Yes, get a new one. That one's toast.

Solder blobs and strand cutoffs can cause a lot of problems. Magnifying desk lamp and inspection mirror, together with tweezers and brush, are useful.

View attachment 158262
Worth using some iso

Next time start up without tubes and check voltages - the unloaded transformer will result in a higher voltage (check the caps can handle it first). If they’re not high then there’s a problem.
 
Top