Furniture Style Cabs Build - Done.

  • Thread starter fitz
  • Start date
  • This site may earn a commission from merchant affiliate links like Ebay, Amazon, and others.

fitz

Well-Known Yinzer
Gold Supporting Member
Joined
Apr 7, 2020
Messages
10,943
Reaction score
32,003
Location
SW PA USA
Lots, and lots, and lots, of sanding today - not very interesting, but here's few progress pics.

Scraping the finish off the door panels after the stripper had some time to work.
I've filled up that little bucket of what I scrapped off everything else.

cherry (59).jpg

After all that sanding, I decided to stain everything prior to assembly.
There's still some trimming and details to cut, but little touch-ups are easier than flipping the cabs all around to stain after assembled.
Here's all the parts for one cab laid out.
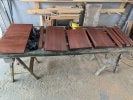
cherry (60).jpg

Stained and stacked to dry.
Touched up the head shell a bit to match how the rest turned out.
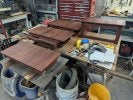
cherry (61).jpg

Hope to get some assembly done tomorrow.
After I get all the boxes together, I can get the baffles and back panels cut to fit.
Also need to cut the logo panel from one of those boards I milled down yesterday.
 

fitz

Well-Known Yinzer
Gold Supporting Member
Joined
Apr 7, 2020
Messages
10,943
Reaction score
32,003
Location
SW PA USA
Got some assembly going today.
More Kreg pocket holes in the cab bottoms.

cherry (62).jpg

Line it up, clamp it in place, drive in the screws.

cherry (63).jpg

Same for the top front face frame rail.

cherry (64).jpg

cherry (65).jpg

Laying out the back panel frames.

cherry (66).jpg

Trimmed that little bevel on the bottom to match the front.
No one will ever see it, but I can't not do it.

cherry (67).jpg

More pocket screws...

cherry (68).jpg

cherry (69).jpg

Those door panels I scraped yesterday will get cut down for the back panels.

cherry (70).jpg
 

fitz

Well-Known Yinzer
Gold Supporting Member
Joined
Apr 7, 2020
Messages
10,943
Reaction score
32,003
Location
SW PA USA
Put the front rails on the M-2 shell and was sliding the bottom panel in when one of the sides panels snapped off at the existing tenon.
(mumble, mumble)

cherry (71).jpg

Was going to glue the bottom into the dados anyway, so I just glued the whole thing back together.

cherry (72).jpg

Here's a view of the tenon on the other side.
I guess it just torqued a little too much and snapped.
It's not coming apart now.

cherry (73).jpg

Added the faux back panel strips to the head shell.

cherry (74).jpg

Laid out the back panel screws.
The whole panel will be removable for speaker access and to get the baffles in and out.
Small holes to screw depth and then I enlarged the holes in the frame.

cherry (75).jpg

Pic of the back frames screwed on.

cherry (76).jpg

And...
I stacked them up for a preview.
Still need to add that little back side strip to the M-2 shell.

cherry (77).jpg

Full frontal...

cherry (78).jpg

cherry (79).jpg

Callin' it a day.
 

fitz

Well-Known Yinzer
Gold Supporting Member
Joined
Apr 7, 2020
Messages
10,943
Reaction score
32,003
Location
SW PA USA
Today's shenanigans.

Started with the back trim on the m-2 shell & glued the bottom in the head.

cherry (80).jpg

Sized the one panel left that was big enough for a baffle and glued 2 pieces together for the other.

cherry (81).jpg

Sanded the door panels to make the cab backs.

cherry (82).jpg

Cut to size and stained.

cherry (83).jpg

Drilled and countersunk perimeter holes.

cherry (84).jpg

Bead of glue and 20 screws.

cherry (85).jpg

Finished back panel view.

cherry (86).jpg

Added cleats to attach the tops.
Front to back grain on the tops will shrink and swell sideways with the weather, so slotted holes to allow movement.
Screwed in from below - snug but not clamped tight.

cherry (87).jpg

Had to use some L bracket for the top on the M-2 shell because of the limited room to drive a screw.
Other than the Kreg screws, all the fasteners in this build are reused from the original TV cabinet.
Screwed the feet on and brought them upstairs for a look at where they'll be going.

cherry (88).jpg

cherry (89).jpg


Need to cut a big hole and drill some little mounting holes in the baffles.
Still looking at grill cloth options.

And I still need to make a logo panel for the head shell.
Getting close to putting some oil finish on.
That'll slow down the progress to a coat a day and then some time to cure.
 

fitz

Well-Known Yinzer
Gold Supporting Member
Joined
Apr 7, 2020
Messages
10,943
Reaction score
32,003
Location
SW PA USA
Just ordered some grill from Ambazon.
Some no-name generic Black & Tan style.
Odd size "last one" end of a roll or something @ 36" x 55" for $20.
(the top one in pic)

1722552643431.png
 

fitz

Well-Known Yinzer
Gold Supporting Member
Joined
Apr 7, 2020
Messages
10,943
Reaction score
32,003
Location
SW PA USA
Baffles laid out and cut.

cherry (93).jpg

Cleaned up the cuts with the oscillating spindle sander.

cherry (94).jpg

Tried out those screw-in threaded inserts instead of the typical T-bolts.

cherry (95).jpg

Predrilled the mounting screw holes, scuff sanded the fronts, and slathered on a quick coat of black stain.

cherry (96).jpg

Baffles in and mounted the speakers.

cherry (97).jpg

Got the jacks installed and put the back panels on.

cherry (98).jpg

One done - repeat the process.

cherry (99).jpg

Stacked them all up and gave it a test run.
Everything is working as it should.

cherry (100).jpg

Also mounted some cup handle drawer pulls.
Kinda furniture-ish, and I got them on clearance for $0.77 each on a parts run to Lowe's.
Grill cloth is due here Monday, so I'm just going to rock it like this for the weekend.

cherry (101).jpg
 

ampeq

Well-Known Member
Joined
Sep 14, 2017
Messages
2,778
Reaction score
3,440
Great job fitz, a perfect leave in the living room setup. Why the flat cuts in the speaker cabs? Is it just for a logo or are you trying something different. Great handle choice by the way, sets it off nice. Awesome!
 

fitz

Well-Known Yinzer
Gold Supporting Member
Joined
Apr 7, 2020
Messages
10,943
Reaction score
32,003
Location
SW PA USA
Great job fitz, a perfect leave in the living room setup. Why the flat cuts in the speaker cabs? Is it just for a logo or are you trying something different. Great handle choice by the way, sets it off nice. Awesome!
Thanks,
Flats are my secret pressure wave bounce back reverb design for the Ceriatone logo plates.
I was looking for more of a rectangular Mission style handles, but the 77¢ each was too low to pass up.
 
Last edited:

fitz

Well-Known Yinzer
Gold Supporting Member
Joined
Apr 7, 2020
Messages
10,943
Reaction score
32,003
Location
SW PA USA
@fitz Amazing project! Nice touch with the cherry V. How did you like the threaded inserts? Never been a fan of the T nuts. How do the cabs sound?

Russ
Thanks,
I like the threaded inserts.
I did a little countersink bevel in the drilled hole, and used a machine screw with a small washer to set the inserts just below the baffle surface.
Worked well on the hardwood and I'd use them again for plywood, but probably not in a particle board baffle.

Cabs sound pretty much the same as those cabs I put the O20C chassis into.
They're about the same size and the difference between 3/4" ply vs. 3/4" hardwood doesn't seem to be drastic.
If anything, the cherry seems a little brighter, but there's no grill cloth yet so hard to render a definitive comparison.
 

fitz

Well-Known Yinzer
Gold Supporting Member
Joined
Apr 7, 2020
Messages
10,943
Reaction score
32,003
Location
SW PA USA
Cherry stack ☑️
HC Flying V ☑️☑️
Bed-frame Al Pedaltrain board 🤨

Looks like someone has a scrap project due next.
My pedal boards move around the amps from time to time.
I've made custom matching boards more than once.
They're all in a pile on the shelves downstairs in my tinkering room.
Pedals come and go, and cheap bed-frame boards are more flexible to inevitable changes.
 

V-man

Well-Known Member
Joined
Jan 25, 2009
Messages
6,659
Reaction score
8,256
My pedal boards move around the amps from time to time.
I've made custom matching boards more than once.
They're all in a pile on the shelves downstairs in my tinkering room.
Pedals come and go, and cheap bed-frame boards are more flexible to inevitable changes.

I wouldn’t have mentioned it but for the OCD-Uniform MXR-type board you had displayed. Your experience certainly mirrors mine though, which is why I have one semi-annual fluctuating main and 3 mini special purpose boards.
 

BlueX

Well-Known Member
Joined
May 5, 2020
Messages
2,658
Reaction score
5,609
Location
Sweden
Thanks,
I like the threaded inserts.
I did a little countersink bevel in the drilled hole, and used a machine screw with a small washer to set the inserts just below the baffle surface.
Worked well on the hardwood and I'd use them again for plywood, but probably not in a particle board baffle.
How did you like the threaded inserts? Never been a fan of the T nuts.
A tip when using this kind of threaded insert near edge or opening (like this), particularly in ply or particle board, is to drill, countersink, and install them before cutting the opening (or the edge to correct dimension). This way you reduce the risk for splintering.

You can also use a drill press (if work piece allows) to mount them square to the surface. Cut the head of a machine thread screw, lock the insert with a nut, and turn the drill by hand while feeding the spindle down.

Great looking "living room" stack, and very nice work!
 

C-Grin

Well-Known Member
Joined
Nov 8, 2020
Messages
1,166
Reaction score
3,324
Location
edge of the Mt. Hood national forest
Baffles laid out and cut.

View attachment 155425

Cleaned up the cuts with the oscillating spindle sander.

View attachment 155426

Tried out those screw-in threaded inserts instead of the typical T-bolts.

View attachment 155427

Predrilled the mounting screw holes, scuff sanded the fronts, and slathered on a quick coat of black stain.

View attachment 155428

Baffles in and mounted the speakers.

View attachment 155429

Got the jacks installed and put the back panels on.

View attachment 155430

One done - repeat the process.

View attachment 155431

Stacked them all up and gave it a test run.
Everything is working as it should.

View attachment 155432

Also mounted some cup handle drawer pulls.
Kinda furniture-ish, and I got them on clearance for $0.77 each on a parts run to Lowe's.
Grill cloth is due here Monday, so I'm just going to rock it like this for the weekend.

View attachment 155433
You are a machine, those look incredible. Nice work sir !!!
 

fitz

Well-Known Yinzer
Gold Supporting Member
Joined
Apr 7, 2020
Messages
10,943
Reaction score
32,003
Location
SW PA USA
Thanks all.

Having the right tools and a plan can make short work of some of these steps.
Cutting up that TV console to reuse existing features saved a ton of time cutting and milling.
And that Kreg Jig gizmo is like instantaneous joinery.

I'm looking forward to getting some oil finish on the wood, but I'm going to wait for the grill cloth to decide on a cherry or ply & grill logo panel on the amp head shell.
The stain really shows some reddish hue in natural lighting, and I hope it pops a bit more with the tung oil.

Putting away piles of tools today and leaf blowing all the sanding dust out of the garage to get ready for multiple coats of finish.
 

fitz

Well-Known Yinzer
Gold Supporting Member
Joined
Apr 7, 2020
Messages
10,943
Reaction score
32,003
Location
SW PA USA
Piled up the leftovers that were scattered about the basement and garage.
I used up a surprising amount of that TV console.
cherry (102).jpg

cherry (103).jpg

And a copy paper box of scraps.

cherry (104).jpg
 
Top