JCM 800 50 watt 2204 mods w/pics

  • Thread starter afmobius
  • Start date
  • This site may earn a commission from merchant affiliate links like Ebay, Amazon, and others.

afmobius

New Member
Joined
Sep 8, 2011
Messages
18
Reaction score
3
Location
Las Vegas, NV
FYI, my JCM has the VERTICAL inputs. For everyone with this set up I wanted to post pics that might make the task a little easier. All the instructions, how to's, etc. were gathered right here on marshallforum from the more knowledgeable techs.

If there are any errors, missed steps, etc. let me know and I will make the change EXCEPT for spelling chassis wrong in the pics… I hate editing text on photos. =)

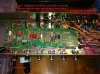
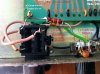
Covering the primary mods: Clip 1 leg or remove both the C4 (treble peaking circuit) and C5 (bright cap). Also replacing R 5 with 68k (from 470k). Together, these mods reduce the tin like highs while getting the amp to produce a more traditional Marshall tone as well as more functionality at lower volumes. This was my 1st time working on an amplifier and start to finish, the job took about 30 minutes. Further, these mods create a lot of improvement for minimal effort.

Items needed: screwdriver, wire snips, a 600 volt rated jumper wire with shielded alligator clips on both ends, digital multimeter that can check up to 600 v dc, solder/soldering iron, a 68 k resistor, canned air, (2) same size blocks (not made of metal), contact cleaner spray and possibly a bleeder tool (will address later).
 
Last edited:

afmobius

New Member
Joined
Sep 8, 2011
Messages
18
Reaction score
3
Location
Las Vegas, NV

[FONT=&quot]1) [/FONT]
[FONT=&quot] To get started, turn the power and standby switches to the on position. [/FONT]

[FONT=&quot]2) [/FONT]
[FONT=&quot] Remove the 4 screws from the base and CAREFULLY slide the amp rack out of the [/FONT]
[FONT=&quot] head. It should be quick and easy--like your sister! Now is a good time to spray[/FONT]

[FONT=&quot] some compressed air around to dust things off. Have 2 same size blocks (NOT made[/FONT]

[FONT=&quot] out of metal) to put at either end then turn rack upside down.[/FONT]


[FONT=&quot]3) [/FONT]
[FONT=&quot] If this is new ground for you, check out the pic below labeled 2204BleedNTest that [/FONT]
[FONT=&quot] shows what you can expect to see when you open the amp and identifies the [/FONT]

[FONT=&quot] location of the parts being modified.[/FONT]


[FONT=&quot]4) [/FONT]
[FONT=&quot] Attach one end of your jumper to the chassis and, with one hand behind your back, the other to Pin 1 of the preamp closest to the caps. (for location see top center of pic labled 2204BleedNTest). Take 5 minutes-- go smoke a cigarette, play a deathmatch on Call of Duty, etc to let the caps drain. It does not really take that long but hey, it was a good time for a break.[/FONT]

[FONT=&quot]5) [/FONT]
[FONT=&quot]Attach the ground from your multimeter to the chassis and, with one hand behind your back, carefully check the voltage on the positive terminal of each cap.[/FONT]
[FONT=&quot](for location see top right of pic labled 2204BleedNTest)[/FONT][FONT=&quot]. If for any reason the voltage did not drain click here-[/FONT]à

http://www.marshallforum.com/workbench/14545-draining-filter-caps-jcm800-2.html


[FONT=&quot]6) [/FONT]
[FONT=&quot]Clip a leg or remove C5… when you clip R5, C4 goes with it… solder in your 68k resistor. (for location see top left side of pic labled 2204BleedNTest). For a close up of the resistors see pic labled 2204ModLocations.[/FONT]

[FONT=&quot]7) [/FONT]
[FONT=&quot]As long as you everything opened up, spray some air around and spray contact cleaner on the pots.[/FONT]

[FONT=&quot]8) [/FONT]
[FONT=&quot]Reassemble, play and be depressed that while your amps sound has improved, your playing has not... =)[/FONT]
 
Last edited:

afmobius

New Member
Joined
Sep 8, 2011
Messages
18
Reaction score
3
Location
Las Vegas, NV
Pic 2204BleedNTest
+G7AwWb+qoQyFAAAAAElFTkSuQmCC
 

Attachments

  • 2204BleedNTest.jpg
    2204BleedNTest.jpg
    57.5 KB · Views: 149
Last edited:

afmobius

New Member
Joined
Sep 8, 2011
Messages
18
Reaction score
3
Location
Las Vegas, NV
Pic 2204ModLocations
 

Attachments

  • 2204ModLocations.jpg
    2204ModLocations.jpg
    56.3 KB · Views: 138
Last edited:

impetus maximus

New Member
Joined
Jun 15, 2011
Messages
270
Reaction score
51
Location
marshallheads.com
i just suggest them as they seem to last. unlike like phototoilet err bucket :fingersx:
so many threads i see "this photo has been deleted from photobucket" etc.
 

afmobius

New Member
Joined
Sep 8, 2011
Messages
18
Reaction score
3
Location
Las Vegas, NV
impetus, Ok here is a link to flickr... my other pix have been up for a while without any problems..

lvheretic's photosets on Flickr

Wilder, I believe this is to ensure any remaining charge in the caps can complete the circuit when you clip onto the preamp to drain... I did this following Lane's instructions-- I am no tech (and do not plan to be) so for me, once I got the "how" I didnt really need the "why"... except in learning Ohm's Law.
 

sweethouze28

New Member
Joined
Nov 14, 2011
Messages
5
Reaction score
0
Location
Quebec , Canada
I have the Canadian model 2204 and i m gonna check if the inside of my amp look like your and if yes , i m gonna mode mine too cauz i found it realy trebbley but i have a lot of bass so...
 

demonufo

New Member
Joined
Oct 23, 2010
Messages
2,211
Reaction score
266
Location
defunctprofilesville
Well, go easy on it, do it one mod at a time and try to live with the results before moving on to the next one.

Personally I think most of the common mods (such as these are) to a 2203/2204 platform mess up the character and the response waaaaay too much. Clipping the brite cap alone causes other side effects, and the amp doesn't clean up too nicely on the guitars volume pot from then on.
Many other mods just make the amp mushy.
 

sweethouze28

New Member
Joined
Nov 14, 2011
Messages
5
Reaction score
0
Location
Quebec , Canada
Ohhhhh i just finish to mod my amp ( 1989 2204 Canadian model ) like you mentioned and... THANKS YOU !!! This mod kick ass !!! The glassy top end have dissapear and the amp sound much bigger !!!
 

Joey Voltage

Well-Known Member
Joined
Dec 22, 2009
Messages
1,717
Reaction score
122
Location
Brighton, MA
Well, go easy on it, do it one mod at a time and try to live with the results before moving on to the next one.

Personally I think most of the common mods (such as these are) to a 2203/2204 platform mess up the character and the response waaaaay too much. Clipping the brite cap alone causes other side effects, and the amp doesn't clean up too nicely on the guitars volume pot from then on.
Many other mods just make the amp mushy.

You know I agree 100% and if you do the silly 68k mod at least put a 1m resistor from wiper to ground of the gain pot, and then lower the value of the first coupling cap to .0022uf...,......,. And while your at it wtf just permantantly install resistive bleeders while your at it, save yourself the trouble.
 

JTyson

Active Member
Joined
Dec 13, 2008
Messages
225
Reaction score
66
Any clips?
would love to hear the results:naughty:
 

afmobius

New Member
Joined
Sep 8, 2011
Messages
18
Reaction score
3
Location
Las Vegas, NV
Sweethouze, Glad the mods worked for you... I have had my amp since the 80's (wow..) and my only regret is not knowing about this and doing it a long time ago...and your right--the tinny highs are replaced with a heavier, balanced tone...
 
Top