Marshall 1972 50w Lead back in the studio

  • Thread starter soundngin
  • Start date
  • This site may earn a commission from merchant affiliate links like Ebay, Amazon, and others.

Pete Farrington

Well-Known Member
Joined
Jan 18, 2021
Messages
3,218
Reaction score
4,248
Location
Staffordshire UK
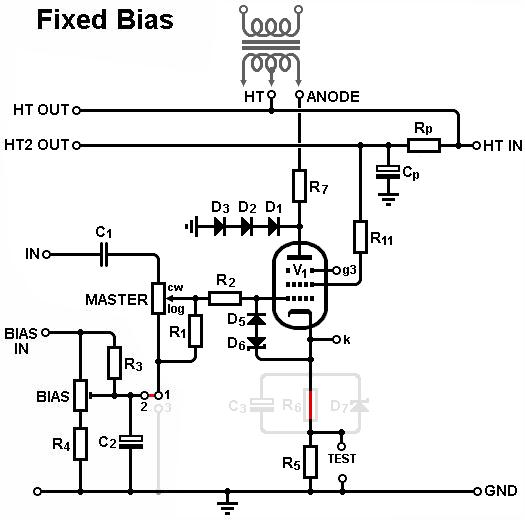
Those spike removal ’snubber’ diodes change the tone of an amp when it’s overdriven.
Try putting their connection to 0V common on a dual pole switch to verify this for yourself. The inductive spikes are part of the sound of an overdriven valve amp.

Whatever, a series pair is probably inadequate, that’s less than a 2kV voltage rating, and there’s more than 2kV there. At least 3 in series is needed. Their failure mode will almost certainly be to short out. Hopefully when that happens, a fuse will blow before a transformer.
 

neikeel

Well-Known Member
Joined
Feb 12, 2014
Messages
8,452
Reaction score
9,605
Those are flyback diodes and will help save the tube/ output transformer in case of voltage spikes. Don't really know much about them but I build Trainwrecks and that's how Ken made his amps.

The amp is a beauty minus the holes in the back. Don't mod the amp or replace the selector. They really don't just fall out. Amps this clean are uncommon and would recommend leaving it as is.

Installing a grounded power cord for safety is about the only thing I would do.
Yes, very much as above, gratuitous ripping out of selectors that may be fine is not my practice in an amp as nice as this (if they are loose or you frequently switch cabs then think about replacing). The ones on an amp I've just posted are really tight (you have to do the two teaspoon trick like you do on guitar pot knobs to get them off!

Good picture here:
octalpcb2.jpg
 

Matthews Guitars

Well-Known Member
Joined
Aug 17, 2019
Messages
8,800
Reaction score
15,098
I agree that if the selector makes firm contact, it should be left alone. But if it's very loose, it's a problem. In this case, you have five options:

1: Risk it and leave it alone.
2: Take it apart, retension the spring contacts, reassemble it, and use it. Be aware, the contacts will lose tension again, eventually.
3: Replace it with a better example of the same thing.
4: Pick one impedance you will stick with forever, bypass the selector, and hard wire your speaker jacks to the chosen tap. This allows you to retain the original outward appearance. On a 100 watt amp with four speaker jacks, you can wire one to the 16 ohm tap, two to the 8 ohm tap, and one to the 4 ohm tap. This is pretty effective.
5: Replace with a quality replacement selector of some type, whether it's another rotary impedance selector as found on newer Marshalls or a rotary switch as I described earlier.
 
Last edited:

soundngin

New Member
Joined
Jan 29, 2022
Messages
12
Reaction score
6
I just had a second look at the selector. It does have a good bit of tension left to it. I am just imagining someone not taking the time to make sure they fully push the knob completely in. Whereas a selector switch snaps it to position eliminating human error. From what I have learned, the consequences of this particular contact can result in life or death of the output trans. With that being said, I believe the selector is in good health, and for now I think I can just cautiously leave it as is, and do a maintenance check on it from time to time. I'm present at most all the recording sessions and I'm now thinking I should limit the amps use to just this cab in the picture. That way I won't be playing with the selector once set.

This cab basically sat idle for the past 30 along with the amp. The cabs tag on the back says 16 ohm, but I'm measuring 4 ohms. I remember the speakers were changed out so I'm thinking the wiring was changed as well. Probably experimenting with different sounds and preferences I suppose. The cab doesn't match the amp. It has a green hue to it. I remember he had the matching green amp but I think he traded it for the 50w lead. I remember being disappointed because it looked better as a matching set, but we were young and ruthless.
Model 1960A.jpg

Neikeel, thanks for the wiring pic. I don't quite get the design and need time to process it. I'm way behind on electronics theory at this point!
 
Last edited:

PelliX

Well-Known Member
Joined
Jun 16, 2020
Messages
7,184
Reaction score
14,618

soundngin

New Member
Joined
Jan 29, 2022
Messages
12
Reaction score
6
You're referring to the resistor tucked under the large mustard cap on the left, right? Looks like it was missing a bit... Took me a moment to spot that, too.
I had to go look for myself. The photo is deceiving. A little of that "paint" or whatever that coating is that they put on all the solder joints got on that resister and makes it look like it melted away or something. The resistor is fully intact. That is the right photo you are looking at but the flaw is in the mod! You can't actually see the defect, but if you trace it, you will find it.
 

PelliX

Well-Known Member
Joined
Jun 16, 2020
Messages
7,184
Reaction score
14,618
I had to go look for myself. The photo is deceiving. A little of that "paint" or whatever that coating is that they put on all the solder joints got on that resister and makes it look like it melted away or something. The resistor is fully intact. That is the right photo you are looking at but the flaw is in the mod! You can't actually see the defect, but if you trace it, you will find it.

Fair enough, but you said 'look closely' - that's like guessing the ESR on a cap... :wtf:
 

soundngin

New Member
Joined
Jan 29, 2022
Messages
12
Reaction score
6
Looking closely at the component you will "see" the possibility for failure!
 

PelliX

Well-Known Member
Joined
Jun 16, 2020
Messages
7,184
Reaction score
14,618
Looking closely at the component you will "see" the possibility for failure!

Bad solder joint on the negative for the jacks...? I'm not bad at visual inspections, but I'm missing this one....
 

soundngin

New Member
Joined
Jan 29, 2022
Messages
12
Reaction score
6
So Close! Not the solder but one jack is different than the other.
 

soundngin

New Member
Joined
Jan 29, 2022
Messages
12
Reaction score
6
If you look at the return jack, there is a spring contact. The contact was not so good anymore. If you plug something in to the return jack that spring contact breaks connection and allows the inserted plug to make signal.
But when unplugged the contact was not working so well. I let this amp sit so long because of this jack, and well maybe because there was some sentimental reasons I didn't want anyone using it at the time.
 

PelliX

Well-Known Member
Joined
Jun 16, 2020
Messages
7,184
Reaction score
14,618
If you look at the return jack, there is a spring contact. The contact was not so good anymore. If you plug something in to the return jack that spring contact breaks connection and allows the inserted plug to make signal.
But when unplugged the contact was not working so well. I let this amp sit so long because of this jack, and well maybe because there was some sentimental reasons I didn't want anyone using it at the time.

Fair call, guv, I didn't see that one right off the bat. When checking an amp I tend to go over any jacks and switches before inspecting at component level, while doing so this would probably have become apparent. Glad you got the amp fully operational again in any case - nice piece of kit. Enjoy it!
 

neikeel

Well-Known Member
Joined
Feb 12, 2014
Messages
8,452
Reaction score
9,605
You should clean all the switching jacks.

I suggest a couple of strips of blotting paper (or sugar paper) and dampen them with Deoxit D5 and 'floss' between the contacts for a couple of minutes each. Then a dab of G100 between the contacts and you are usually good to go.

Sometimes you have to re-tension them if they have had something plugged in for years.

Usually still preferable to taking the old ones out and replacing them with likely inferior new ones (if you have to replace then 'Cliff UK' marked ones are the only type to use.
 

soundngin

New Member
Joined
Jan 29, 2022
Messages
12
Reaction score
6
When checking an amp I tend to go over any jacks and switches before inspecting at component level, while doing so this would probably have become apparent. Glad you got the amp fully operational again in any case - nice piece of kit. Enjoy it!

Thank you I am for sure enjoying the amp very much. I think for you guys who do this all the time you would have discovered the problem rather quickly, especially with the amp sitting in front of you. I found it by chance really, with the help of the forum. I'm not an amp tech, and I don't know much about the differences in amps all that much. I don't even play guitar all that well. So yeah I might be a little out of place in this forum.

I do have a passion for producing music and I know a good guitar amp tone when I hear it. I really do need to find an amp/guitar tech local to my area. I'm In the northeast suburb of Philadelphia so if you are out there please chime in. Most musicians bring in their own amps but I want to have some in house amps for more diversatility. I'm very much now considering purchasing a new Marshall amp just to have for comparison with the old. May even do a documentary. So I'm going to poke around on the forum and see if I can find advise on a good modern Marshall amp for recording purposes.

You should clean all the switching jacks.

I suggest a couple of strips of blotting paper (or sugar paper) and dampen them with Deoxit D5 and 'floss' between the contacts for a couple of minutes each. Then a dab of G100 between the contacts and you are usually good to go.

Sometimes you have to re-tension them if they have had something plugged in for years.

Usually still preferable to taking the old ones out and replacing them with likely inferior new ones (if you have to replace then 'Cliff UK' marked ones are the only type to use.

Neikeel, great I think this is really good info. I am leaning towards replacing the send and return jacks as they are non-original anyway. Gold plated contacts would be great. These were installed as a mod to the original amp. I'm going to get those Deoxit products like you mentioned.
 

LoudStroud

Well-Known Member
Joined
Sep 22, 2020
Messages
346
Reaction score
699
On the subject of Input I being so bright at lower volume settings (bright cap), I’ve found that with early 70’s Pulsonic cone Celestion’s, the amp doesn’t sound nearly as shrill bright as it does with later 70’s blackback Celestion’s or current issue G12M’s. Current issue G12T-75’s Vintage 30’s and and reissue G12-65’s have a mellower top end. Or get ahold of a pair of original early 70’s G12M-25’s or G12H-30’s!

The sound of going straight into the bright channel (no jumper to Bass Ch) with volume set around 3-5 will take you back to that early Allen Collins Skynyrd sound or early Alice Cooper. Clean clear and cuts right thru the mix!
 

LoudStroud

Well-Known Member
Joined
Sep 22, 2020
Messages
346
Reaction score
699
Also see your amp has the “chiclet” style coupling caps, which seems characteristic to the ‘72 year, vs the round mustard style. The only year I’ve noticed where they were used. I have a ‘72 Park 75 with the same chiclet caps and a ‘72 Bass 50 w the same circuit and mustards. The Park seems a hair edgier. Granted it has KT88’s but you can still the noted smoother tone of the mustards. Both sound awesome in their own right.
 
Top