• We are looking to make improvements to the Classifieds! Help us determine what improvements we can make by filling out this classifieds survey. Your feedback is very appreciated and helpful!

    Take survey

NGD - Cabronita Thinline Tele (build done)

  • Thread starter fitz
  • Start date
  • This site may earn a commission from merchant affiliate links like Ebay, Amazon, and others.

fitz

Well-Known Yinzer
Gold Supporting Member
Joined
Apr 7, 2020
Messages
10,994
Reaction score
32,197
Location
SW PA USA
I've been working on this for a while.
Was figuring on a fairly high probability of complete "throw it in the burn pile" type of failure, so I didn't post any pics until I got it functional.
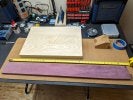
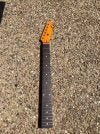
Started off with an ash slab I bought a year or so ago for another project that never materialized, traded a pedal for a custom made no-name tele neck, and found a cool piece of purpleheart wood at the local Rockler.
w-10.jpg w-9.jpg

I got plenty of (100+) build pics to post, but I'm starting off with where I'm at with it now.
Still need to disassemble everything and get a final coat of clear (possibly multiple) on after the scuffs and such from assembly and testing.
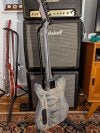
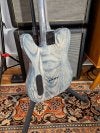
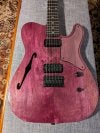
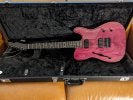
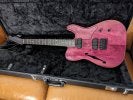
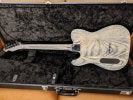
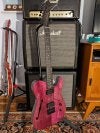
So, here's the almost finished and functioning bookmatched purpleheart cap / ash back Cabronita Thinline.
The back of the body and neck are stained with "Phantom Gray", front of the headstock is stained black (awaiting a custom decal), and the purpleheart cap is nothing but clear lacquer.
Pups are GF'Trons Alnico V 6.6k / 6.0k set from Guitar Fetish, as is most of the hardware.
(Its' a clear pickguard with a black beveled edge, if you're wondering...)
w-1.jpgw-2.jpgw-3.jpgw-4.jpgw-5.jpgw-6.jpgw-7.jpgw-8.jpg

Special thanks to Russ (@Geeze ) for the technical consultations - he's seen some teaser pics in a PM.
 

fitz

Well-Known Yinzer
Gold Supporting Member
Joined
Apr 7, 2020
Messages
10,994
Reaction score
32,197
Location
SW PA USA
On with the build pics:
(had to resize & group into batches that fit in a post)

Started the build with getting the purpleheart board into 4 thin pieces.
Cut the 38" board in half for two 19" pieces.
It was milled flat, but had a bit of a hockey stick curve toward the end with a big knot, so I made a jig the square one side.

2-01.jpg2-02.jpg

With a flat side to ride the fence, the other side just needs a pass through the saw to square it up.
The other half was straight enough to just run through.
Now on to re-saw the two boards down the middle for a pair of book match halves.
Added a vertical fence to my jig and began running the boards across the blade - raising about 1-4" each pass until about the middle, then flip & repeat.

2-03.jpg2-04.jpg

Boards were almost 1" thick, and I lost a bit from the saw kerf and my jig wasn't exactly laser accurate, but any remaining thickness over 1/4" was more than I needed.

2-05.jpg2-06.jpg

Repeated the process for both halves of the original board.

2-07.jpg

I was able to borrow a 12" surface planer from my brother, so milling the 4 pieces down to almost final thickness was a breeze - a very noisy breeze.
Here's a pic of the 2 bookmatched sets milled flat and watered down to see the grain.

2-08.jpg

Laid them out on the ash slab to try different arrangements.
Kinda liked the split knot in the middle.

2-09.jpg

Edge glued the right & left sides.
The final center seam will get joined when the cap panels get glued to the body back.

2-10.jpg
 

fitz

Well-Known Yinzer
Gold Supporting Member
Joined
Apr 7, 2020
Messages
10,994
Reaction score
32,197
Location
SW PA USA
Thanks, here's the next batch:

That ash slab I had laying around was 1-3/4" thick, as I originally intended it to be an LP Jr. body.
Since I'm adding a 1/4" cap, and while I had the borrowed planer, I ripped the slab back into 3 pieces and milled them down to 1-1/2".
Reglued back into a panel.

3-01.jpg

Belt sanded the glue joints, and random orbit sanded the panel nice and smooth again.

3-02.jpg3-03.jpg

That neck I got for the Mesa pedal had a nice finish, but I couldn't find a stain I liked that would match on the ash - so I stripped & sanded it back to plain wood.
Seller said it was maple, but I think it's mahogany.

3-04.jpg

Tried a little of the phantom gray on everything, along with some Tru-oil to get a feel for a final look.
Went as far as staining and coating the neck back with the Tru-oil, but it was getting a brownish shade I didn't like...
So, I stripped the neck again.

3-05.jpg

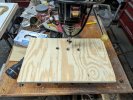
The key for me to pull this off was in making a series of templates that I could change out and use for each step.
The top & bottom stubs (with the blue dots) are index holes that align with holes in the ash slab.
Downloaded the free templates and had them printed out full scale - spray glued to 1/4" plywood.

Left template is for the body cavities and the neck rout.
Center template is for the F hole, back access hole, pickups, and outside body shape.
Right template is a single use guide for the cover plate recess on the rear access hole.

3-06.jpg3-07.jpg3-08.jpg3-09.jpg3-10.jpg
 

fitz

Well-Known Yinzer
Gold Supporting Member
Joined
Apr 7, 2020
Messages
10,994
Reaction score
32,197
Location
SW PA USA
That turned out really good Fitz - but for the love of God trim those strings before you put yours or someone else's eye out!


Congrats!
LOL, it's my last set of strings - I left them long so I can re-thread them through the body after I take it apart, clear coat, and put it back together again.
New strings are on the list of stuff to get...
 

fitz

Well-Known Yinzer
Gold Supporting Member
Joined
Apr 7, 2020
Messages
10,994
Reaction score
32,197
Location
SW PA USA
With the templates ready, the wood carnage commenced.

Started with the rear access hole.
No need to go deep, the front cavity will overlap.
Routers are indispensable tools for this process, but they are easier to control when just trimming up edges.
Things can go wrong in a hurry with a router - stay tuned.... :rofl:
To hog out masses of wood, my favorite tool is a Foerstner bit in the drill press.

4-01.jpg

Added an extension table to my drill press to support the ash slab.

4-05b-jpg.143633


Cleaned up with the router - shaft bearing follows the template.

4-02.jpg

Then the recess for the cover panel.
Raised the template with some scraps of 1/2" play so the router only cuts 1/8" deep.

4-03.jpg4-04.jpg4-05.jpg

Started on the front cavities with the drill press.
Came in opposite the rear access hole to set a depth the leaves about 3/8" on the back thickness.

4-06.jpg4-07.jpg

Hogged out as much as I could reach with the 4" throat on my drill press.

4-08.jpg

Had to swap templates and do a rough cut of the body shape to reach the rest of the cavities.
Need some turning holes for the band saw, so I got the ones I could reach with the drill press and the rest with this hand drill guide.

4-09.jpg
 

Attachments

  • 4-05b.jpg
    4-05b.jpg
    150.2 KB · Views: 44

fitz

Well-Known Yinzer
Gold Supporting Member
Joined
Apr 7, 2020
Messages
10,994
Reaction score
32,197
Location
SW PA USA
Very very nice! This turned out awesome Fitz! Love the color of the neck/body to contrast the PH top.

How does it sound?

Russ
Thanks again Russ.
It sounds fantastic - definitely better than my previous home builds and cheapo mods.
The neck is way better than the MIC baseball bat ones I've used on the other builds.
Not sure what the original neck profile was, but it's a thin C, now that I've stripped and sanded it a few more times... :D
 

fitz

Well-Known Yinzer
Gold Supporting Member
Joined
Apr 7, 2020
Messages
10,994
Reaction score
32,197
Location
SW PA USA
Used the body shape template to draw some rough-cut lines around the slab.
Just gotta keep the band saw blade between the lines...

5-01.jpg5-02.jpg

Got the body shape roughed in, and switched back to the drill press.
Those stubs with the template reference points will stay on until I'm almost done.

5-03.jpg

With the added clearance, I could reach the rest of the cavities with a Foerstner bit to depth.

5-04.jpg

Router on the template to trim up the edges.
Multiple cuts to depth reduces chips and tear outs.

5-05.jpg

Final depth and kinda smoothed out the bottom.
None of this needs to be pretty, you'll only see a little bit through the F hole if you shine a light in.

5-06.jpg

Did another trim of the outside to minimize what the router needs to do.
Cleaned up the edge on the oscillating spindle sander.
The less work the router has to do, the easier it is to control.

5-07.jpg

On to the router table for the 1st outside body rout.
Template is face down here on the first pass, riding on the bit shaft bearing.
Just cut about 1/2 way and then flip it over.

5-08.jpg

Next bit is a top bearing that rides the first cut and mills off the other half.
Template is on top, but it's already done its job on the first cut.

5-09.jpg

Back to the oscillating spindle sander to clean up the router marks.
At this point the body is mostly milled and ready for the purpleheart cap.

5-10.jpg
 

fitz

Well-Known Yinzer
Gold Supporting Member
Joined
Apr 7, 2020
Messages
10,994
Reaction score
32,197
Location
SW PA USA
Each progressive saw cut, drill hole, or router pass has a given chance of making a mistake.
As the process continues any mistake kinda hoses everything that's been done so far.
So, before gluing the cap on, comes one of the steps that I have been dreading.
The F-ing F hole...

Started with aligning the 2 sides of the cap with the now mostly milled back and secured it to the template.
(The cap pieces are not long enough to actually hit both of the reference points on the slab or templates)
Drilled holes for the 2 radius ends of the F hole and the smaller "hook" at each end.

6-01.jpg

Then I drilled as many 1/8" holes as I could along the remaining edges.
With a hand coping saw, I connected the dots.
Didn't take many pics here, because one F-up, and I'm F-ing going back to Rockler and start again with some other F-ing kind of wood for a cap...
Cleaning up the inside edges of the F hole was a painstaking process, but patience prevailed.
Files small enough to fit in the space we too fine to accomplish any kind of wood removal.
Wound up wrapping 100 grit sandpaper around the files in order to make any headway at removing the unwanted bits.

6-02.jpg

The better part of a day later, I got an F hole that I could say is about as good as I could get it with the tools I have.
So... time to glue on the cap.

6-03.jpg

Lined up the 2 sides along the center line of the body with a little glue and a few clamps.

6-04.jpg

That set overnight in the clamps, so I began preparations for the neck rout.
Using the actual neck as a guide, I glued on some rails to the template that will act as both the router bearing guides and risers to set the neck cut depth.

6-05.jpg6-06.jpg

Clamps off, the cap is now one with the back.

6-07.jpg

And a view from the other side.

6-08.jpg

Trimmed off as much of the extra cap as I could with a close cut on the band saw and spindle sanded the rest down flush with the body sides.
I didn't want to risk having a router bit grab the purpleheart and rip out a chunk at this point in the build.
I covered the F hole to keep it from snagging on anything and added another piece of cardboard to the other side to keep it level when inverted.

6-09.jpg

Some additional scraps of wood around the neck rout to give a wide base to keep the router level and steady for this cut.
Significant chance of complete disaster with what's going to happen next - either going to be good to go, or unsalvageable burn pile fodder.

6-10.jpg
 

fitz

Well-Known Yinzer
Gold Supporting Member
Joined
Apr 7, 2020
Messages
10,994
Reaction score
32,197
Location
SW PA USA
First pass with the router in the neck cut.
Just barely deep enough to get through the cap for as clean of a cut on the top as possible.
So far, so good.

7-01.jpg

Second pass to 5/8" depth per spec.

7-02.jpg

Template off - looks good.
I had left extra material on each side that can be cleaned off later with tools a little less aggressive than the router.

7-03.jpg

Spindle sander getting closer to the final neck pocket shape.

7-04.jpg

This was an end of the day shot with a splash of water to show the grain, and see where I was at.

7-05.jpg

Some sanding while I waited for hardware to arrive.
Front & back pics.

7-06.jpg7-07.jpg

Got the stuff from GFS so I did a little mock-up.

7-08.jpg

Need to align the neck so I can set the bridge length and locate the pups.

7-09.jpg

With the neck snug in the pocket set on the centerline, I flipped it over to drill & screw on the neck plate.
3 screws in and the 4th snapped off flush with the body.
As Russ would say, "mumble, mumble..."

7-10.jpg
 

fitz

Well-Known Yinzer
Gold Supporting Member
Joined
Apr 7, 2020
Messages
10,994
Reaction score
32,197
Location
SW PA USA
Mumble Mumble indeed!

I'm impressed with your attention to detail and using tools in stages to work your way into your cuts / pockets.

Russ
Thanks,
All the time spent making templates and switching between tools may seem excessive and unnecessary, but I think in the long run it's a time saver.
I'm also always trying to be aware of the dangers with my power tools, and how I can do what needs done without losing any fingers.
Speaker cabs and guitars would be fairly useless with stumps at the end of my arms.
 

fitz

Well-Known Yinzer
Gold Supporting Member
Joined
Apr 7, 2020
Messages
10,994
Reaction score
32,197
Location
SW PA USA
Ok, derailed on a screw removal...
Absolutely nothing to grab onto, and in far enough to be holding onto the neck on the other side.
Started with a bunch of tiny holes tight all around the screw - kinda hitting wood and threads at the same time...

8-01.jpg

Bigger holes into the smaller holes.

8-02.jpg

Finally able to get some needle nose pliers on it and twist out what was left of it.

8-03.jpg

Bored out the scraggly hole to a nice clean 3/8" diameter.

8-04.jpg

Cut some 3/8" plugs from a scrap of the ash cut off earlier when shaping the body.

8-05.jpg

8-06.jpg

Glued a plug in from each side and clamped.

8-07.jpg

Saw cut and sanded the plug on the back.
Neck plate will cover it, and no one will ever know except you & me. :D

8-08.jpg

8-09.jpg

Couldn't get a saw & sander in the neck pocket so I just cut it flush with a chisel.

8-10.jpg

Ok, back in business. :yesway:
 

fitz

Well-Known Yinzer
Gold Supporting Member
Joined
Apr 7, 2020
Messages
10,994
Reaction score
32,197
Location
SW PA USA
Next up - pickup routs:
Modified the body shape template with the final pup locations and added some 1/4" spacers to get the correct depth of cut.
As usual, hogged out what I could with a Foerstner bit - clean up with the router.

9-01.jpg

ROUTER WENT ROGUE!
Bearing on the first cut slipped under the template.
Took about a half of a second to do this damage.
(mumble, mumble...)
Did I mention things can go wrong in a hurry with a router?
Second cut stayed on the template, so I got the correct shape at the bottom of the rout.

9-02.jpg

That was actually the last of what I needed to do with the router.
F-ed it up when I had the finish line in sight...
Made a patch from the template alignment tabs that are no longer needed.
Already had the purpleheart laminated to the ash.

9-03.jpg

Shaped a patch with the belt sander - just ground away at the shape till it fit the curve.
Glued it in a little high, and left it a little wide to trim down later.

9-04.jpg

A little drum sander in that drill guide shaped the vertical edge to match.

9-05.jpg

Sanded the top flush.
Grain doesn't match, but this close up makes it look bigger than it is.
Did anyone notice this in the first post pics?

9-06.jpg

Another mock-up for setting the bridge and drilling the string through holes.

9-07.jpg

Used that drill stand gizmo again - the drill press won't reach to the through string holes.

9-08.jpg

Drilled holes for the volume knob and 3-way toggle for a test fit.

9-09.jpg

Black stain on the headstock face and masked off the back of the body and neck.
Shot a clear coat on to seal up these areas before staining the backs with the gray.

9-10.jpg
 
Last edited:

fitz

Well-Known Yinzer
Gold Supporting Member
Joined
Apr 7, 2020
Messages
10,994
Reaction score
32,197
Location
SW PA USA
Stain on the backs and a first coat of clear over everything.

10-01.jpg

4th coat - I spray out in the garage, and hang to dry in the laundry room.

10-02.jpg

Here's the backside of the string through holes.
Nice & straight on the top, but the drill bit wanders a little on its way through 1-3/4" of wood.
Need to enlarge the holes to 1/4" anyway for the ferrules.

10-03.jpg

So, I made a drill template out of a piece of aluminum laid out to the correct 1/4" hole spacing.

10-04.jpg

Ferrule holes lined up.

10-05.jpg

More coats of clear...

10-06.jpg

Almost forgot the bridge ground...

10-07.jpg

Drilled a hole under the bridge.

10-08.jpg

Used a suuuper long drill bit to come in at a shallow angle from the pup hole and hit the hole down from under the bridge.

10-09.jpg

More coats of clear...

10-10.jpg
 

fitz

Well-Known Yinzer
Gold Supporting Member
Joined
Apr 7, 2020
Messages
10,994
Reaction score
32,197
Location
SW PA USA
Did a heavy coat on the front with it lying flat.

11-01.jpg

Time for final assembly.
Started wiring it up and guess what this jack hole forgot to do...

11-02.jpg

The jack hole. :rolleyes:
Back out to the garage...

11-03.jpg11-04.jpg11-05.jpg

After some wiring shenanigans, I got it reading correctly on a meter for the pup switching.

11-06.jpg

Threw it on the scale before stringing it up.

11-07.jpg

And here's where we started.
Waiting on the headstock decal and I'll take it all apart and shoot another coat or more over the decal and the body.

11-08.jpg

I should also add some special thanks to my brother - even though he'll never read this thread.
Lending me his 12" surface planer practically made this entire build possible.
Not even sure how I could have done this without it.
Getting the purple heart panels down to exactly 1/4" and re-milling the slab down to 1-1/2" flew past in a couple pics here but took most of a day.
I didn't take any pics of it in action because using it requires a degree of laser focus or limbs go missing.

11-09.jpg
 
Top