• We are looking to make improvements to the Classifieds! Help us determine what improvements we can make by filling out this classifieds survey. Your feedback is very appreciated and helpful!

    Take survey

Simple Attenuators - Design And Testing

  • Thread starter JohnH
  • Start date
  • This site may earn a commission from merchant affiliate links like Ebay, Amazon, and others.

IvanMan

New Member
Joined
Dec 6, 2018
Messages
6
Reaction score
3
Hi @IvanMan , welcome to our thread.

The values are very carefully optimised to maintain tonal consistency at all settings and provide equal steps. I suggest 5% tolerance is OK. Maybe you could get some higher value and lower powered resistors to put in parallel with what you have to bring down the values?

Designing this needs close control of both input and output impedance at each setting, taking into account the amp and the speaker as a reactive load. Its too complex for a formula, I do it using a huge spreadsheet that plots every setting, and also SPICE models.

I guess you can wind the coil, if you can keep it tight and have a way to measure it afterwards. Personally I wouldn't trust formulas for inductance except as an approximation.

Good luck!
Hi JohnH, and thanks for your reply.
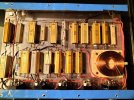
After some calculations I find series/parallel combination of the resistences I've already bought (used for my previous project) to match the requested values for 16 Ohm M2. My only concern is: using two (and in one case 3 resistor in parallel) may cause a change in tone / performance of the M2?
For the coil I find here in Italy a producer of HiFi component that have the 1.8mH / 18Awh(1mm) in catalogue for 10Euro. One problem solved :)
After your opinion I'll start with the realization.
 

JohnH

Well-Known Member
Joined
May 31, 2008
Messages
6,156
Reaction score
5,062
Location
Wilton NSW
If you can get close to the specified R values, with a series or parallel combination of any kind, then it should make no difference to the tone compared to using a single resistor
 

donwagar

Well-Known Member
Joined
Nov 24, 2018
Messages
254
Reaction score
694
Location
Calgary, Alberta
I'm just starting a second one for a friend, a standard M2 8 ohm.

Thanks Gene for the wiring diagram on pg 111, that's awesome.

Question: what gauge Bus Bar wire are you guys using? 18? The heaviest solid core wire I have on hand is 20 ga.
 
Last edited:

JohnH

Well-Known Member
Joined
May 31, 2008
Messages
6,156
Reaction score
5,062
Location
Wilton NSW
hi @donwagar , I had some bare runs between lugs to connect on mine. I used what I had which was 0.7mm, but with two runs of it in parallel which adds up to the same area as 18ga . It was just my work-around to get my prototype built but it was easy to bend and fit through small switch lugs.
 

Lancer X

New Member
Joined
Feb 10, 2022
Messages
24
Reaction score
18
Finally completed my M2 build. Works perfectly and sounds great! Much less high end loss than my Weber MiniMASS. This is clearly a superior design. Hooked it up to my Tweed Deluxe, and at max attenuation with the amp dimed was at a mild conversational volume with no loss of character. Power tube overdrive in full effect. Excellent.

Build thread part one here, and part two here.

Thanks so much out to @JohnH , @Gene Ballzz , and everyone else contributing here!
 

JohnH

Well-Known Member
Joined
May 31, 2008
Messages
6,156
Reaction score
5,062
Location
Wilton NSW
Hi @Lancer X , thanks very much for trusting this design and for building it so nicely. I'm very happy that it's working well in your rig.
 

BlueX

Well-Known Member
Joined
May 5, 2020
Messages
2,703
Reaction score
5,676
Location
Sweden
I've got problems with my M2. After completing the soldering I didn't get proper connection or consistent Ohm readings on inputs and outputs. De-soldered the jacks, and did some measurements.

When I measure on both lugs for each connection (Tip, Ring, and Sleeve, respectively), there is continuity (low resistance) without any plug in the jack. However, when I insert the plug there is no continuity (OL on resistance) between lugs at each connection. This is the same for all jacks and connections, also Ring on input and Out 1 and Out 2 which I haven't soldered. See pictures.

Anyone knows if this is normal, or if I got jacks with some kind of switch function?

EDIT (I forgot to add the previous test): When I measure with a plug inserted (Sleeve connected to black input on DMM) there is only one of the corresponding lugs that have contact with the plug sleeve. See the last two pictures.

Cliff jack problem a.JPGCliff jack problem b.JPG
Cliff jack problem c.JPGCliff jack problem d.JPG
 
Last edited:

JohnH

Well-Known Member
Joined
May 31, 2008
Messages
6,156
Reaction score
5,062
Location
Wilton NSW
Hi @BlueX , is see you have the switched jacks with 6 lugs. That's all fine but are you connecting to the correct lugs? A basic M2 only uses one side of the jack, being the contacts that connect to the plug when its pushed in. If in doubt, you can bridge across each jack , as on Genes diagram on p111 and mine on the next page.

Important to make sure you are getting 7 to 10 Ohms (for an 8 ohm M2) at the far end of a cord (ie where it will go into the amp) plugged into the input, with a speaker in the output.
 

BlueX

Well-Known Member
Joined
May 5, 2020
Messages
2,703
Reaction score
5,676
Location
Sweden
Hi @BlueX , is see you have the switched jacks with 6 lugs. That's all fine but are you connecting to the correct lugs? A basic M2 only uses one side of the jack, being the contacts that connect to the plug when its pushed in. If in doubt, you can bridge across each jack , as on Genes diagram on p111 and mine on the next page.

Thanks @JohnH , that clarifies the situation! I will keep these jacks, bridge both lugs, and check for proper connection.
 

BlueX

Well-Known Member
Joined
May 5, 2020
Messages
2,703
Reaction score
5,676
Location
Sweden
I resoldered the jacks and now my M2 works properly. Consistent repeated readings between In/Tip and Out1/Tip, Out2/Tip, and Out3/Tip, for the different switch settings. Speaker cable in Amp In sees between 7,4 and 8,4 Ohm with one 8 Ohm cab connected.

Did some playing too, through my SV20H, and it sounds just great. It's a real pleasure to hear the tubes scream, at moderate listening levels. Thanks for all support, and many thanks for designing this great piece of gear!
 
Last edited:

Gene Ballzz

Well-Known Member
Joined
Feb 19, 2013
Messages
4,697
Reaction score
6,521
Location
Las Vegas, NV
Yes, more evidence that simple "spot testing" of different internal portions of this design can produce unexpected results, due to less than obvious interactions of multiple components. The real litmus test is with a speaker (of known, proper impedance) plugged into the output jack and a cable or bare connector measured while plugged into the input but not into the amp. Even testing continuity at lugs that are connected by a simple wire won't necessarily provide accurate results. Test as per @JohnH and the above suggetions and if not correct, you need to physically trace, inspect and "proofread" your work!

As a random example: Testing for continuity of the wire/solder joints between R1 and R5, at the resistor lugs may or may not show continuity, even if one or both of those solder joints is cold or otherwise not well connected! Again, this was just one random example, but continuity tests are not appropriate here!

And yes, congrats again to @BlueX for getting this up and running!

Just Connectin'
Gene
 

russbryant

New Member
Joined
Apr 19, 2021
Messages
7
Reaction score
3
John, Thanks for all the work you have done on this. Haven't bought a tube amp yet but starting to look around for one. I may just go ahead and build one while waiting. Did you ever test on the Crate SS amp? Wondering how it went as I have an Orange Micro Terror that puts out 20 watts of loud.

Thanks,
Russ
 

JohnH

Well-Known Member
Joined
May 31, 2008
Messages
6,156
Reaction score
5,062
Location
Wilton NSW
John, Thanks for all the work you have done on this. Haven't bought a tube amp yet but starting to look around for one. I may just go ahead and build one while waiting. Did you ever test on the Crate SS amp? Wondering how it went as I have an Orange Micro Terror that puts out 20 watts of loud.

Thanks,
Russ

Hi Russ, thanks for joining our thread.

Actually, I dont think I ever did try it with my old Crate PowerBlock amp. There's no reason why it wouldn't work as a test bed for building an attenuator though. It is likley to have a different tone though due to the very different output stage. Ongoing, it probably wouldn't really be useful except as a test until you get a tube amp;
 

russbryant

New Member
Joined
Apr 19, 2021
Messages
7
Reaction score
3
Thanks for the reply John. I found this thread a few weeks ago and have finally read through it all. Will be building it at some point. I used to build HI-Fi speakers a few years back. Got started learning guitar a couple of years ago after retiring. Still a beginner but getting better. Have a background in EE and software.
 

IvanMan

New Member
Joined
Dec 6, 2018
Messages
6
Reaction score
3
If you can get close to the specified R values, with a series or parallel combination of any kind, then it should make no difference to the tone compared to using a single resistor
Here is my M2 16 Ohm attenuator, using serial / parallel resistor to obtain the requested value.
Unfortunately the user (my son, the family guitarist!) is not so satisfied.
We tested it with a 100W Marshall Plexi head, and the Marshall 1960 cab.
He says that mid-high frequencies are lost and also the sound is poor of harmonics.
Do you think that something in the realization may be the reason?
Is there the possibility to make some tests to verifiy the frequency response of the attenuator (I've a signal generator, oscilloscope, and other stuff).
Many thanks

PS You can see in the picture that the jacks are not Cliff type, but they are insulated ones.
 

Attachments

  • IMG20220311200915.jpg
    IMG20220311200915.jpg
    501 KB · Views: 37

Gene Ballzz

Well-Known Member
Joined
Feb 19, 2013
Messages
4,697
Reaction score
6,521
Location
Las Vegas, NV
Here is my M2 16 Ohm attenuator, using serial / parallel resistor to obtain the requested value.
Unfortunately the user (my son, the family guitarist!) is not so satisfied.
We tested it with a 100W Marshall Plexi head, and the Marshall 1960 cab.
He says that mid-high frequencies are lost and also the sound is poor of harmonics.
Do you think that something in the realization may be the reason?
Is there the possibility to make some tests to verifiy the frequency response of the attenuator (I've a signal generator, oscilloscope, and other stuff).
Many thanks

PS You can see in the picture that the jacks are not Cliff type, but they are insulated ones.

Nice work! Is that a steel chassis?
Just Askin'
Gene
 

JohnH

Well-Known Member
Joined
May 31, 2008
Messages
6,156
Reaction score
5,062
Location
Wilton NSW
hi @IvanMan , congrats on getting it together but sorry to hear that it doesn't seem to sound right.

Id like to help understand the issue, and there are a number of tests that you can do. What we know from testing and evaluation on the previous builds is that the M and M2 designs make very little difference to tone, at any setting.

That being said, a truely loud amp will sound different to an attenuated one. Even with a perfect attenuator, there will be somewhat different speaker response, acoustic feedback to the guitar, and differences in hearing and personal experience. We need to accept that these may be a factor, although my belief now after a few years on this is that they get blamed for more issues than they really cause.

So back to testing the attenuator. Its ideal goal is a simple one: At any attenuated volume, and at any amp setting, or any input to the amp, the measured response at the speaker should match that with no attenuator (ie speaker direct to amp), but at a lower volume. So, if you record at full and attenuated settings, normalize them so they are at the same max volume, you should hear no difference in the recording, and also see no difference in a frequency response trace. This design gets very close to that ideal, and its been confirmed by independent tests with different amps.

On yours, I suggest first to do some resistance tests to confirm the wiring and also the resistor combinations that you used.

1. If you unplug everything and switch all switches to not attenuating, then there are no paths through the circuit except around L1, R2A and R2B. So if you measure across each of the groups that you assembled to match the values in the design, you should be able to check each one with no rewiring to check if they are close. Measure across R2A (22 Ohm) and you are reading in combination with L1 and R2B, and you should get very close to 10 Ohm.

2. The most important check before trying with an amp: Amp disconnected, speaker plugged into the attenuator, measure across a lead plugged into the attenuator input (where the amp would go), and in every setting, it should read 7 to 10 ohms for an 8 Ohm M2.

When noting resistances, subtract for the meter leads and any zero error when touching meter leads together.

3. Frequency tests: I like to do these by close micing the speaker, even though this adds the variable of the speaker response at different levels. I set up to run a short loud riff that pushes the amp output, and record that via a mixer into my pc, where I use Audacity. Need to be sure that the mic, mixer and pc can deal with the loudest sound with no added recording distortion. Then I use a delay pedal to set up a looped riff, just a few seconds is fine, and record that.

Then, without stopping the loop or moving the mic or any control, switch amp to standby (important) and put the attenuator in, and reengage the amp. Now record the same loop at the attenuated setting. I normalise the recordings and listen. Then I make frequency plots and export to excel to overlay them. They should be parallel.

You can see and hear my version of this in Post 1 (Design M but it works the same). There are some small ripples between full volume and the first setting, but all attenuated responses are very close and they all sound very similar.

4. The alternative to that is to feed in a frequency sweep. That might give a cleaner plot, though harder to evaluate as a guitar sound. You might also do that set so the amp stays clean for this test.

You could try all that at just one key setting, or work through the different steps as I did.
 
Top