Help 2555SL no sound, no light in preamp tubes

  • Thread starter siav
  • Start date
  • This site may earn a commission from merchant affiliate links like Ebay, Amazon, and others.

NickkiC

Active Member
Joined
Jul 8, 2022
Messages
81
Reaction score
121
Location
OnTheBog
Uh no, disconnect that footswitch.


As outlined earlier in the thread, this amp is a bit of an oddball in the sense that there's mixed AC and DC heating. I'd check the rectifier as I suggested, as that's the beginning of the DC heated section.


They look fine on the pics, I wouldn't assume that there's any issue here - at least for now. No *harm* in doing so properly, but I'd stop things melting before I worried about a dodgy contact there.
Replacing those damaged wires and checking solder connections won’t take long and it’s easy. Going by pictures how do you know a solder joint is sound? I’d like to learn, I’m not a professional. I’ve read and learned a lot from your posts and information. Useful stuff, helped fix many amp issues.
 
Last edited:

PelliX

Well-Known Member
Joined
Jun 16, 2020
Messages
7,185
Reaction score
14,619
Replacing those damaged wires and checking solder connections won’t take long and it’s easy.

If you replace the wire that connects your footswitch and your heater circuit, you will simply melt something. I've thought of an alternate explanation though: perhaps the guy was using a footswitch that required DC voltage for something. Anyhow, that's neither here nor there as we have the problem now.
:)


Going by pictures how do you know a solder joint is sound? I’d like to learn, I’m not a professional. I’ve read and learned a lot from your posts and information. Useful stuff, helped fix many amp issues.

Well, a mix of things. First of all, an optical inspection even by a pro never trumps a measurement - let that be clear. Next, things like a shiny surface on a nice round ball of solder are a good sign as you can assume with some safety that the solder was properly heated and applied when the joint was made. If a joint looks dark, porous or uneven or if you can see cracks it's suspect. That doesn't mean it's not working correctly, but *suspect*. If the solder is not nicely rounded or has a 'sticky out bit' from pulling the iron away it often indicates insufficient heat was applied or there was a problem with the solder used. Again, these are indications only. Joints that have darkened due to 'sweating' are often a good thing to check, too, especially on non-vintage equipment. Newer lead-free solder doesn't expand and contract with the board as nicely as leaded one does. This in turn results in greater stress on the joints themselves and can cause cracks/disconnects.

A simple rule of thumb that I generally pass on to people is "a good mechanical joint makes for a good solder joint". if you can hook a wire in place or otherwise improve its solderless mechanical stability - do so before soldering.
 

Pete Farrington

Well-Known Member
Joined
Jan 18, 2021
Messages
3,218
Reaction score
4,248
Location
Staffordshire UK
you've probably got a cooked rectifier, but a (semi-) working heater tap on the PT. Check the voltage in to and out from the rectifier for the preamp valves' heater circuitry. If you're getting 6.3V-ish AC at the input, the tap is probably fine. Output voltage (if any) from the rectifier will of course DC.

this amp is a bit of an oddball in the sense that there's mixed AC and DC heating
I don't see a DC supply for the preamp heaters on the schematic?
 

NickkiC

Active Member
Joined
Jul 8, 2022
Messages
81
Reaction score
121
Location
OnTheBog
@PelliX
I see foot the foot-switch wire attached to heater at V2.

Appreciate the visual soldering brief, being a new member I should have been more detailed about the visual, mechanical and continuity checking of solder joints when I recommended it.
A000E822-2B1F-4B84-8242-5BC559F6A517.jpeg
 
Last edited:

PelliX

Well-Known Member
Joined
Jun 16, 2020
Messages
7,185
Reaction score
14,619
I don't see a DC supply for the preamp heaters on the schematic?

Took me a moment to figure out what went wrong there, I was looking at the schematic for the 2550. Funnily enough, that supplies voltage from the heater supply to the footswitch...
 

Pete Farrington

Well-Known Member
Joined
Jan 18, 2021
Messages
3,218
Reaction score
4,248
Location
Staffordshire UK
Took me a moment to figure out what went wrong there, I was looking at the schematic for the 2550. Funnily enough, that supplies voltage from the heater supply to the footswitch...
Dunno if I'm missing something, but in that regard, the 2555 and the 2550 are the same?


siav

Active Member
Joined
Jun 23, 2009
Messages
464
Reaction score
61
Location
Nordland
@PelliX
I see foot the foot-switch wire attached to heater at V2.

Appreciate the visual soldering brief, being a new member I should have been more detailed about the visual, mechanical and continuity checking of solder joints when I recommended it.
View attachment 118724
So there is a wire from v2 to the foot switch. Right @PelliX ?

Can you please more photos especially the power tubes and impedance selector?
 
Last edited:

Sledge Johnson

Active Member
Joined
Dec 31, 2021
Messages
36
Reaction score
121
No mods, it was like that and I put electric cable around the place it had melted
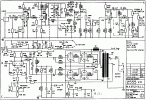
Modded by a previous owner before you got it maybe ?

Seems a safe bet the footswitch didn't come wired from the factory that way.

Recommend you find a tech to put the amp back to stock.
 

Gunner64

Well-Known Member
Gold Supporting Member
Joined
Nov 16, 2013
Messages
9,188
Reaction score
15,578
Location
Midwest, USA
2555 schematic..rectified for the footswitch, indicator led..does anyone see a straight line connection to the f.s. to the tube socket?
 

Attachments

  • 2555amp.gif
    2555amp.gif
    89.1 KB · Views: 10

NickkiC

Active Member
Joined
Jul 8, 2022
Messages
81
Reaction score
121
Location
OnTheBog
I have a few more pictures for reference; been looking at 2555’s but these aren’t mine. I Google’d and found this, from Reverb. 03F24DC0-B497-4C24-A1BA-80D1E9AB324D.jpeg
Listed as un modded, un touched……
 
Last edited:

NickkiC

Active Member
Joined
Jul 8, 2022
Messages
81
Reaction score
121
Location
OnTheBog
2555 schematic..rectified for the footswitch, indicator led..does anyone see a straight line connection to the f.s. to the tube socket?
From heaters?
Sorry. No, I don’t.
 
Last edited:

siav

Active Member
Joined
Jun 23, 2009
Messages
464
Reaction score
61
Location
Nordland
I have a few more pictures for reference; been looking at 2555’s but these aren’t mine. I Google’d and found this, from Reverb. View attachment 118732
Listed as un modded, un touched……
Thanks but I’d like a wiring diagram for the power tubes.
I found this one so far, does it match?
7927C2F6-5B73-4358-8F57-2464A4907F40.jpeg
 

PelliX

Well-Known Member
Joined
Jun 16, 2020
Messages
7,185
Reaction score
14,619
^ Yes, they're wired in parallel.

2555 schematic..rectified for the footswitch, indicator led..does anyone see a straight line connection to the f.s. to the tube socket?

No, but if you're tapping the 6.3V winding, then it doesn't seem that strange? After all, the schematic states "To heaters" but doesn't show a single valve socket - it's implied.
 

siav

Active Member
Joined
Jun 23, 2009
Messages
464
Reaction score
61
Location
Nordland
@PelliX the schéma i found is for a 50w. It is to be repeated for the 2 other output tubes then?
Please, I need a clear answer on whether I should keep the cable from the preamp tube and footswitch ?
 

Pete Farrington

Well-Known Member
Joined
Jan 18, 2021
Messages
3,218
Reaction score
4,248
Location
Staffordshire UK
does anyone see a straight line connection to the f.s. to the tube socket?
Yes, see the circuit block in middle of schematic, ‘to heaters’ at the rh end, and the footswitch socket at the other.
The top line runs from one side of the heaters to the footswitch sleeve.

Whether accidentally or intentionally, if someone plugged in a lead whose sleeve was connected to earth, there’d be trouble …
 
Last edited:

FleshOnGear

Harmonic Hermit
Gold Supporting Member
Joined
May 2, 2017
Messages
2,745
Reaction score
4,897
Location
Virginia
Yes, see the circuit block in middle of schematic, ‘to heaters’ at the rh end, and the footswitch socket at the other.
The top line runs from one side of the heaters to the footswitch sleeve.

Whether accidentally or intentionally, if someone plugged in a lead whose sleeve was connected to earth, there’d be trouble …
Aha! So I read the schematic wrong. It is possible to wire the heater directly to the footswitch per the schematic, after all. I could see how there’d be a danger in possibly shorting the heater winding.
 

Gunner64

Well-Known Member
Gold Supporting Member
Joined
Nov 16, 2013
Messages
9,188
Reaction score
15,578
Location
Midwest, USA
I could see how there’d be a danger in possibly shorting the heater winding.
With the way that insulation has melted off the heater wires it seems a shorting situation like Pete described is a very definite probability.

The op needs to take some measurements, starting at the transformer heater tap,..and cross your fingers there's voltage there.

Hard to imagine they'd implement a set up like that and not fuse the heaters.
 
Top