Dragon Head Shell Build For An SLP

  • Thread starter Geeze
  • Start date
  • This site may earn a commission from merchant affiliate links like Ebay, Amazon, and others.

Geeze

Well-Known Member
Joined
Jul 25, 2015
Messages
2,920
Reaction score
7,770
Location
Floating around TN in Marshall Heaven
I've been at this design for well over a year. Each iteration wilder and crazier than the last. The last idea was a dragon claw 'bursting' out of the head shell top and scratching the face plate. I've done some wacky things with wood over the years but figuring out how to make curly maple look like it actually was peeling back by a taloned claw [also curly maple] and the desire for the damn thing to fit in a standard flight case finally killed the eruption idea.

I still plan on a claw [with ebony talons] as a separate piece sitting on top with two This is MINE! possessive scratches on the face plate. More on that later.

I recently moved to Tennessee and have found a magnificent wood store in Knoxville called Jeffries. I've lived a pretty thin wood source existence in Dallas TX for a long time but Jeffries was the first time I got to slobber on top shelf curly, fiddle back, quilted and birdseye maple all in one store. I've been a bit distracted by building bits for the house like this birdseye dining table.

UV5EBnQ.jpg


But now that it's done I am able to focus on the Dragon.

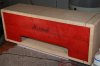
This will be the face plate

P2hV8rs.jpg


And the sides [none of the pics of the top were in focus]

Le9jZOi.jpg


The initial plan is finger joints and I plan to experiment with a scarlet and orange two tone dye job to simulate flames. But first I have to mill the 15/16" down far enough to take the bow out of the planks. Finger joints absolutely loathe warped wood.

Russ
 

Attachments

  • dragon-head-shell-build-slp-amp.jpg
    dragon-head-shell-build-slp-amp.jpg
    118.1 KB · Views: 5

fifteenohms

Well-Known Member
Joined
Sep 30, 2010
Messages
1,071
Reaction score
558
Location
Los Angeles, CA
I think you might invest in a drum sander wide enough to hit that right.

Figured maple blows out till you kill the thickness trying to fix it: "oh one more pass- oops"

Its gonna mess w you
 

Geeze

Well-Known Member
Joined
Jul 25, 2015
Messages
2,920
Reaction score
7,770
Location
Floating around TN in Marshall Heaven
I think you might invest in a drum sander wide enough to hit that right.

Figured maple blows out till you kill the thickness trying to fix it: "oh one more pass- oops"

Its gonna mess w you

One of the best tools in my shop! That's why I get planks that the figure is on both sides.

So milled flat tonight and ready for trim up then finger joints tomorrow.

VEbjeIq.jpg


Russ
 

Geeze

Well-Known Member
Joined
Jul 25, 2015
Messages
2,920
Reaction score
7,770
Location
Floating around TN in Marshall Heaven
Trimmed up the sides and top being very careful to remove as little as possible on the mating joints between to minimize the interruption of the grain flow as it goes around the corner. Just a look thing.

For those who have just tuned into the woodworking foolishness that I enjoy - I've take some pics of the finger jointing jig - I stole the design somewhere.

The planks are clamped to the back and the aluminum 'key' controls the spacing.

uPaSXw4.jpg


Since the 'fingers' inter-lap like, well, fingers it's necessary for the 'off' side plank to be offset so the leading edges line up. I use a .750" spacer in between the key and the plank for the first cut so it will be offset. I typically use .750" fingers for big projects like cabs but have built a few boxes with .500".

nr1P3ii.jpg


As you can see I mark the planks for the first cut as to keep me from having to artfully 'fix' a wrong cut. I've done it before.

ng6EAeb.jpg


I generally finger joint planks that are thicker than the finish thickness to remove any tear out that can occur even when using a backer board. I didn't have any this go round.

qamhqrQ.jpg


Dry assembled.

S8aA2qw.jpg


I don't waste a plank of beautiful wood for the bottom of most cabs as they won't be seen. I cut a pair of strips from the scrap for the front and back edge and cut fake fingers to put in the lower edge.

More pics to come.

Russ
 

Geeze

Well-Known Member
Joined
Jul 25, 2015
Messages
2,920
Reaction score
7,770
Location
Floating around TN in Marshall Heaven
The sides, top and faceplate were originally 15/16" thick, milled to 7/8" to take the bow out of them, finger joints cut then milled down to 3/4". Now the fingers stand 'proud' about .025".

ehwFhU3.jpg


Glue up commences.

EKrnh4k.jpg


While the first two pieces cure I started to work on the back of the face plate - sanding 60, 80 then 150 grit so I can apply the first dye scarlet.

l5UJepi.jpg


Then dyed with RIT fabric dye. I'm not sure why but RIT dyes don't seem to raise the grain like standard water based wood dyes do.

b4CbjAo.jpg


Coffee break.

Russ
 

Geeze

Well-Known Member
Joined
Jul 25, 2015
Messages
2,920
Reaction score
7,770
Location
Floating around TN in Marshall Heaven
The next steps are cutting and gluing in a plywood bit between the facing bits [front & back] for the bottom.

UwUWJ3R.jpg


I mentioned 'fake' fingers above and here is a pic.

iPTvwn2.jpg


They get glued in the bottom finger slots to simulate a full piece of maple.

a73Y9uX.jpg


So far on the dye options I'm really liking the scarlet sanded back with the orange not sanded with clear shot on top. I'm planning on carving in the Marshall logo like I did for a 2204

UhZNd6U.jpg


Except the logo will be black or maybe silver if I can get it shiny enough.

Russ
 

Kelia

Well-Known Member
Joined
Feb 26, 2018
Messages
1,835
Reaction score
2,456
The next steps are cutting and gluing in a plywood bit between the facing bits [front & back] for the bottom.

UwUWJ3R.jpg


I mentioned 'fake' fingers above and here is a pic.

iPTvwn2.jpg


They get glued in the bottom finger slots to simulate a full piece of maple.

a73Y9uX.jpg


So far on the dye options I'm really liking the scarlet sanded back with the orange not sanded with clear shot on top. I'm planning on carving in the Marshall logo like I did for a 2204

UhZNd6U.jpg


Except the logo will be black or maybe silver if I can get it shiny enough.

Russ
Gold looks nice !
 

Geeze

Well-Known Member
Joined
Jul 25, 2015
Messages
2,920
Reaction score
7,770
Location
Floating around TN in Marshall Heaven
Since the cab wall thickness is 3/4" vs. Marshalls 5/8" ish I'm doing a 3/4" round over on the all the edges save for the back side. My process is to draw lines at 3/8" and plane a bevel near to those lines and use an orbital sander to 'finish' the bevel. The reason for the hand plane then sander are due to tear out. As you can see in the next pic the plane is tearing out the grain a bit. With a router running 15 to 18K RPM the tear out can be catastrophic.

ibauqPa.jpg


Then I clean up the tear out with the sander.

kgkQU6l.jpg


Then with the sander [80 grit] I sand a couple of intermediate bevels on either side and then 'round' over from each of the flat sides. This one has a bit more rounding to be done.

bjhZfgt.jpg


Now I'm cutting in the face plate after a cup of coffee.

Russ
 

Geeze

Well-Known Member
Joined
Jul 25, 2015
Messages
2,920
Reaction score
7,770
Location
Floating around TN in Marshall Heaven
this is sick geeze.

Thank you and it is a disease too!

Shell and face plate sanded and fitted.

x9qrbMX.jpg


EcfRLAr.jpg


Because I absolutely refuse to cut cooling vents [unless I have to cover for a FUBAR or it's part of the design] I've been cutting in louvers of a sort in the face plate.

AOsvIZO.jpg


Some airflow is better than none.

Now I need to decide what type of piping to use on the faceplate - either walnut or epoxy over black. The challenge is cutting the channels. I'll probably mod the StewMac dremel router base I used for the Vines 2204.

owcyGI0.jpg


Nothing quite so nutty though.

Russ
 

Geeze

Well-Known Member
Joined
Jul 25, 2015
Messages
2,920
Reaction score
7,770
Location
Floating around TN in Marshall Heaven
After agonizing about how to cut the piping channels on the face plate, top and leading edges I finally manned up and cut them on my table saw.

nHwDPyi.jpg


Then I ripped some Peruvian walnut - very dark when finished - on the band saw then milled the strips down to the .100" thickness I needed [width of my saw blade].

Glue time.

Top.

Mluevmz.jpg


Middle strip and top strip on the face plate.

qZgRXt0.jpg


Bottom.

W7DVvno.jpg


After all the piping is glued and sanded happy it will be time to carve on the Marshall logo. 1959 logo is 6" but I'm very tempted to do 9" so it will show up better. Decisions, decisions.

Russ
 

royslead

Well-Known Member
Joined
Jan 19, 2011
Messages
1,834
Reaction score
1,271
Location
Wisconsin
Make it easy on yourself, go with a 7 1/2" logo.

As per usual, Geeze - nice work!
 

Geeze

Well-Known Member
Joined
Jul 25, 2015
Messages
2,920
Reaction score
7,770
Location
Floating around TN in Marshall Heaven
Make it easy on yourself, go with a 7 1/2" logo.

Tempting but I'm going all in on the SLP design so 6" it is. Do ignore that I'm not using tolex, making it black or will use an outrageous dye scheme - but I'm sticking to the Marshall plan. :facepalm:

Had to make some awkward relief cuts for the piping 'wrap around' on the control panel. Got the bits glued in.

M4ZPRbu.jpg


Also rough sanded the top piping - starting to look SLP.

RE8PD3a.jpg


Tomorrow logo carving time.

Russ
 

Geeze

Well-Known Member
Joined
Jul 25, 2015
Messages
2,920
Reaction score
7,770
Location
Floating around TN in Marshall Heaven
Logo time.

I cheat a bit and use a traced stencil as a proportion and placement guide then draw the details in by hand.

xeCigiO.jpg


bURTyKb.jpg


The logo has a big draft angle - top is smaller than the bottom - not going to emulate that. I started to hand carve this like I did the last one but power tools have called my name.
 

Geeze

Well-Known Member
Joined
Jul 25, 2015
Messages
2,920
Reaction score
7,770
Location
Floating around TN in Marshall Heaven
My beloved 6" magnifying light decided to bite the big one and I needed a bit of eyeball assistance. After flailing about plotting to a fix the 5" lens to my head, clamps and guitar cable ties to the rescue. It's ugly but it saved me from dashing through the monsoon to a store to get another one.

dsZi12z.jpg


Here is the logo after tape off [to keep the black spray paint in the correct place], epoxy applied and while semi cured I pulled off most of the blue tape.

HXlmXgO.jpg


And sanded.

9HUEySC.jpg


I filled most of the pin holes but I messed with the epoxy too much as I attempted to level it and created a pant load of bubbles.

I sanded to 220 and applied the RIT scarlet dye. The original plan was a two tone with the scarlet sanded back and orange applied then sealed. It always struck me as over the top gaudy. Since I strive for subtle, understated and easily overlooked designs [who am I kidding?!?] I may just use the scarlet and then seal. A red head appeals to me.

ElPFEQr.jpg


TVmvrZE.jpg


Russ
 

Latest posts


Top